Friday, December 13, 2019
My Favorite Photoshop Tutorials
In looking for the perfect tutorials that the web had to offer, I found that I favored ones that were simple and to the point. I like when I can feel I have learned a significant amount of information that I should useful to me developing skills on an application further. I chose 3 that reflected this. Each has a focus on highlight 10-20 topics that are essential to becoming proficient in Photoshop. I really enjoyed masking tutorials and tutorials that walked you through a design.
Friday, December 6, 2019


Friday, November 22, 2019
Business Cards


My business cards feature my logo along with some contact info. My goal for this project was to make a card that is simple and functional. I think I generally suceeded in this. I chose a more minimalist style becuase I thought it would look more attractive and professional to employers. I chose the main color for each card based off of the color selection I chose for my logos. My favorite one is the blue card. I like the way these came out because they are to the point and let my logo shine.
Monday, November 18, 2019
My Favorite InDesign Tutorials
1. https://youtu.be/AshfNo-i8Ws
This first tutorial will lay down the foundation for all you need to know in beginning to use Adobe InDesign. I really liked this one because it is short, to the point, and focuses on essentials that will allow you to have a base level knowledge of InDesign tools. After using InDesign, I found many of the tips to be incredibly useful and factual.
2. https://youtu.be/mVW8AF2TMnw
I usually tend to be a bigger fan of tutorials that break down the basics in a way that is equally informative and digestible. This tutorial breaks down 10 of the key skills that will set you up to be proficient in InDesign. I found it informative and all the tips listed were ones that I have or plan to use in the future.
3. https://youtu.be/g-lm_rP79C4
This tutorial is one of my favorites. It not to long but more detailed than some other tutorials. It provides a lot of useful information and detail through each step. The creator of the video takes there time to break down each all the information and in the end our are better equipped to use InDesign.
Wednesday, November 13, 2019
Doll

In this assignment, I tried to choose a landscape that would make me a doll and also provide me with a landscape that matched my desired theme. From the photo of myself that I chose, I decided a 90s era doll house would be a cool option to place myself into. I wanted it to feel nostalgic and look as if I was as someone in that time would be. I used a few filters to make the blend more homogenous and realistic. I really liked this assignment and I think it allowed me to improve my masking skills significantly. I like the style of the result and I think the color match turned out really well. It ended up looking a lot more realistic than I thought it would. I thought this was definitely one of my favorites because I was really able to bring my design to life.
Monday, November 4, 2019
Analogous


For this project, I tried to choose a variety of color options that showed the best application of what we have learned in class. I found this to be one of the more difficult assignments we have done this semester. It took a lot of time and concentration to mask out each element and get it looking the way I desired. I chose this photo because I figured that I would enjoy experimenting with skin and changing the colors on my face. I used a few filters to make the blend more natural as if it were my own skin. I found that really interesting although I takes some time. I really enjoyed using adobe color for my design and experimenting with shade and colors. Overall, this assignment taught me a lot about masking and photoshop. I think I learned quite a bit in the end due to how much time I spent trying to learn the mechanics of the program.
Tuesday, October 29, 2019
Brush

My tag brush is shown above in pink. I chose pink because I wanted a brighter color to allow my logo to stand out even more. I also really liked the color pink so it was an obvious choice. As for my logo, it represents aspects of my heritage and personal identity. The flower is due to me being named after the jasmine flower and the Chinese symbol in the center translates to “treasure”. It’s a symbol that’s has always been used in my family because my last name is Jewell. The design represents me in many ways and acts as a portrayal of my identity. The tag brush will be my signature on the rest of my designs.
Wednesday, October 23, 2019
My Favorite Illustrator cc Tutorials
These are my favorite Illustrator cc tutorials.
This tutorial teaches the basics of illustrator by showing the process of creating a design of little potted plants. It makes it a lot more interesting than traditional tutorials that tend to just flip through the different tools. The tutorial was really easy to follow and the format of the tutorial was more interesting than others.
Although this video is longer, I think it really covers the most essential facts that will allow you to be successful in Illustrator. Out of all the videos, this one proved to be the most informative out of all the videos I watched. I feel I learned the most from this video and was able to use the knowledge I accumulated in my project.
This tutorial covers the essentials in a quick, easy, and digestible way. Every element covered by the creator of the video was important and helpful. It was defined well presented and crafted. I think it could’ve been a bit longer to include more information.
Self Portait


My self portrait design is fairly minimalistic and modern. I chose this style because I found it most appealing to the eye. The reference photo I used was of me holding a penny up to the camera. I liked the photo and I thought it was a bit more interesting than a normal shot of my face. I drew up my design on Procreate (a drawing app that I have on my iPad). Then, I transferred the image to Illustrator and used the pen tool to create the shapes. The words I placed over top the photo were meant to incorporate more modernistic elements and make the design look more like a poster. I chose some song lyrics that I liked. It refers to youth and hippie culture of the 60s, with mention of long blonde hair often tied to the style back then. By cutting your hair you are shedding your youth or a lifestyle you once lived. I didn't have a strong concept going in other than that I wanted it to be modern and simple. The photo and words I chose had little correlation when I began but i think it the end the idea was developed.
Sunday, October 20, 2019
Gradient Mesh Project


The purpose of my work was to demonstrate and understanding of the gradient mesh tool and well as an understanding of color. I chose a photo that I had taken, so that I could create a pumpkin. I wanted something that was fall themed and had a general amount of colors that would allow me to utilize gradient mesh to the best of my abilities. I used gradient mesh to build in shadows around the pumpkin to create depth and shape. I used the pen tool to outline the shape of the pumpkin and then filled it with color. After, I used the gradient mesh tool to build in the shadows.
Tuesday, October 15, 2019
Illustrator Project


For my design, I chose a symbol that had personal meaning by its physical representation of my name. I used a jasmine flower to symbolize my first name and the Chinese symbol for my last name to add elements of my heritage. The symbol is something that my family uses a lot. Also, i'm half Chinese so adding this element to the design made it even more personal. I used path finder tool to create the petals on the flower. For my color choices, I wanted to give myself a variety of different options. The jasmine flower is a a white flower so I initially had some difficulty figuring out where to add color. I ended with 3 options in with the first is my favorite: one with minimal color, one with only a colored outline, and one more colorful option.
Saturday, October 12, 2019
Calligram

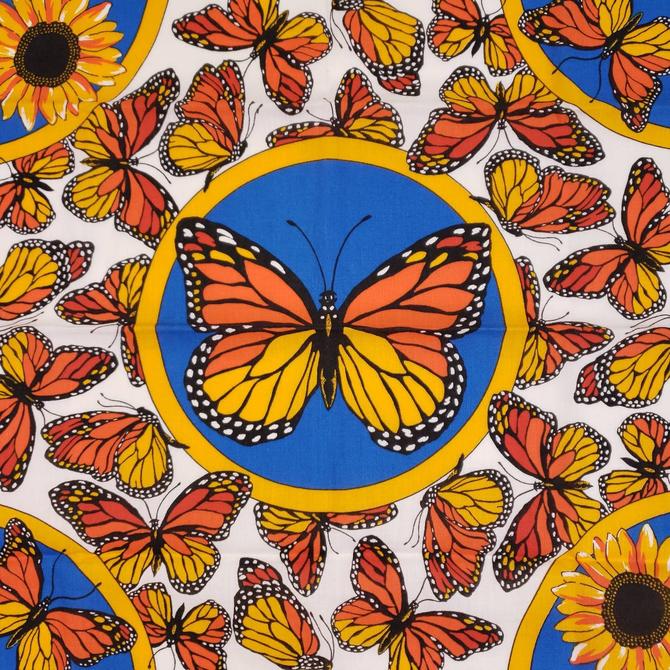
The purpose of my work was to demonstrate an understanding of illustrator's tools and developing a clear shape using typography. When choosing a design, I wanted a shape with natural curvatures that would allow me to bend the type easily. I felt that a butterfly offered me with a variety of ways to utilize different tools like "type on path". I used a poem for my text entitled "An Irish Blessing". I felt it was the perfect length for the design. I bent the type to build the shape of the butterfly wings and used solid letters to form the body and antennae. To further form the shape of the design, I used the type on path tool to outline the whole design. I really like butterflies and am drawn to natural shapes found in nature when choosing my designs. I spent a lot of time manipulating the type to get it to the correct composition I desired. I also drew inspiration from the inserted photo. This is an old Bandana.
Tuesday, September 17, 2019
My Canvas Experiment

I tried my best to take the image of sunset and recreate it with flatter shapes. To do this, I had to study the way the sun peaks out from the land and the rays cascade into the gradient sky. I used Bézier curves to imitate the rays and a quadratic curve to create the sun peaking o ut from the landscape. Grass and a bed of flowers lie at the bottom to build in the landscape even more. The flower petals took much manipulation to get them to be the correct composition. The birds acted as another chance to use quadratic curves.
Final Code
<!DOCTYPE HTML>
<html>
<head>
<script>
window.onload = function() {
var canvas = document.getElementById("myCanvas");
var context = canvas.getContext("2d");
////////////////////////////////////// start below this line ˇˇˇˇˇˇˇˇˇˇ
var x=0;
var y=0;
var width = 900
var height= 600;
context.beginPath();
context.rect(x, y, width, height);
context.lineWidth = 0;
//context.fillStyle = 'rgb(0,255,0)';
context.strokeStyle = 'rgb(255,0,0)';
// add linear gradient
var grd = context.createLinearGradient(200.000, 0.000, 200.000, 600.000);
// starting color
grd.addColorStop(0, "rgb(255, 255, 0");
//intermediate color
grd.addColorStop(0.5, "rgb(255, 102, 0)");
// ending color
grd.addColorStop(1, "rgb(255, 0, 0)");
context.fillStyle = grd;
context.fill();
context.fill();
//repeat yelow lines top left
var x = 800;
var y = 600;
////Repeat loops example
for (var i=200; i<canvas.height; i+=25) {
context.beginPath();
context.lineWidth = i/300;
context.strokeStyle = "rgb(255, 255, 102)";
context.moveTo(400, 500);
context.lineTo(canvas.width, i);
context.stroke();
}
for (var i=0; i<canvas.height; i+=10) {
var startX = 3;
var startY = 800;
// starting point coordinates
var endX = 1000;
var endY = i;
var cpoint1X = canvas.width;
var cpoint1Y = canvas.height;
var cpoint2X = i;
var cpoint2Y = 275;
context.beginPath();
context.moveTo(startX, startY); ///cpoint1Y
context.bezierCurveTo(cpoint1X, cpoint1Y , cpoint2X, cpoint2Y, endX, endY);
context.lineWidth = 1;
context.strokeStyle = "rgb(255, 255, 102)";
context.stroke();
}
/////// BEZIER CURVE 2 middle
for (var i=0; i<canvas.height; i+=10) {
var startX = 50;
var startY = +800;
// starting point coordinates
var endX = i;
var endY = -1000;
var cpoint1X = canvas.width;
var cpoint1Y = canvas.height;
var cpoint2X = i;
var cpoint2Y = 175;
context.beginPath();
context.moveTo(startX, startY); ///cpoint1Y
context.bezierCurveTo(cpoint1X, cpoint1Y , cpoint2X, cpoint2Y, endX, endY);
context.lineWidth = 2;
context.strokeStyle = "rgb(255, 255, 102)";
context.stroke();
}
/////// BEZIER CURVE 3 left side
for (var i=0; i<canvas.height; i+=10) {
var startX = -3;
var startY = 800;
// starting point coordinates
var endX = -1000;
var endY = -i;
var cpoint1X = canvas.width;
var cpoint1Y = canvas.height;
var cpoint2X = i;
var cpoint2Y = 275;
context.beginPath();
context.moveTo(startX, startY); ///cpoint1Y
context.bezierCurveTo(cpoint1X, cpoint1Y , cpoint2X, cpoint2Y, endX, endY);
context.lineWidth = 1;
context.strokeStyle = "rgb(255, 255, 102)";
context.stroke();
}
// starting point coordinates
var x = 0;
var y = 600;
// control point coordinates ( magnet )
var cpointX = canvas.width / 2 - 50;
var cpointY = canvas.height / 1.5 - 300;
// ending point coordinates
var x1 = 800;
var y1 = 600;
context.beginPath();
context.moveTo(x, y);
context.quadraticCurveTo(cpointX, cpointY, x1, y1);
context.lineWidth = 5;
context.strokeStyle = 'rgb(255, 255, 102)';
context.stroke();
context.fillStyle = 'rgb(255, 255, 102)';
context.fill();
var x=50;
var y=100;
var width = 300
var height= 250;
context.stroke();
//stem
// for a square width = height , the width and the height have the same value
var c = document.getElementById("myCanvas");
var ctx = c.getContext("2d");
ctx.beginPath();
ctx.rect(285, 450, 10, 450);
ctx.fillStyle = "green";
ctx.fill();
//petal 1
var Ax = 300;
var Ay = 450;
var Bx = 300;
var By = 450;
var control1x = 250;
var control1y = 400;
var control2x = 250;
var control2y = 475;
context.beginPath();
context.moveTo(Ax,Ay);
context.bezierCurveTo(control1x, control1y, control2x, control2y, Bx, By);
context.lineWidth = 5;
// line color
context.strokeStyle = 'rgb(255, 0, 0)';
context.lineCap = 'round';
context.stroke();
context.fillStyle = 'rgb(255, 0, 0)';
context.fill();
//petal 2
var Ax = 300;
var Ay = 450;
var Bx = 300;
var By = 450;
var control1x = 350;
var control1y = 400;
var control2x = 350;
var control2y = 475;
context.beginPath();
context.moveTo(Ax,Ay);
context.bezierCurveTo(control1x, control1y, control2x, control2y, Bx, By);
context.lineWidth = 5;
// line color
context.strokeStyle = 'rgb(227, 148, 169)';
context.lineCap = 'round';
context.stroke();
context.fillStyle = 'rgb(227, 148, 169)';
context.fill();
//petal 3
var Ax = 300;
var Ay = 450;
var Bx = 300;
var By = 450;
var control1x = 275;
var control1y = 400;
var control2x = 350;
var control2y = 400;
context.beginPath();
context.moveTo(Ax,Ay);
context.bezierCurveTo(control1x, control1y, control2x, control2y, Bx, By);
context.lineWidth = 5;
// line color
context.strokeStyle = 'rgb(177, 126, 224)';
context.lineCap = 'round';
context.stroke();
context.fillStyle = 'rgb(177, 126, 224)';
context.fill();
//petal 4
var Ax = 300;
var Ay = 450;
var Bx = 300;
var By = 450;
var control1x = 275;
var control1y = 500;
var control2x = 350;
var control2y = 500;
context.beginPath();
context.moveTo(Ax,Ay);
context.bezierCurveTo(control1x, control1y, control2x, control2y, Bx, By);
context.lineWidth = 5;
// line color
context.strokeStyle = 'rgb(2, 137, 209)';
context.lineCap = 'round';
context.stroke();
context.fillStyle = 'rgb(2, 137, 209)';
context.fill();
//petal 5
var Ax = 300;
var Ay = 450;
var Bx = 300;
var By = 450;
var control1x = 215;
var control1y = 475;
var control2x = 290;
var control2y = 500;
context.beginPath();
context.moveTo(Ax,Ay);
context.bezierCurveTo(control1x, control1y, control2x, control2y, Bx, By);
context.lineWidth = 5;
// line color
context.strokeStyle = 'rgb(255, 145, 0)';
context.lineCap = 'round';
context.stroke();
context.fillStyle = 'rgb(255, 145, 0)';
context.fill();
//context.rect(x, y, width, height); // top left corner x and y coordinates, width and height
// for a square width = height , the width and the height have the same value
var c = document.getElementById("myCanvas");
var ctx = c.getContext("2d");
ctx.beginPath();
ctx.rect(0, 550, 900, 460);
ctx.fillStyle = "green";
ctx.fill();
// bird
// starting point coordinates
var x = 200;
var y = 200;
// control point coordinates ( magnet )
var cpointX = canvas.width / 3 - 50;
var cpointY = canvas.height / 3 - 15;
// ending point coordinates
var x1 = 250;
var y1 = 225;
context.beginPath();
context.moveTo(x, y);
context.quadraticCurveTo(cpointX, cpointY, x1, y1);
context.lineWidth = 5;
context.strokeStyle = "rgb(0,0,0)";
context.stroke();
// starting point coordinates
var x = 300;
var y = 200;
// control point coordinates ( magnet )
var cpointX = canvas.width / 2.5 - 50;
var cpointY = canvas.height / 3 - 15;
// ending point coordinates
var x1 = 250;
var y1 = 225;
context.beginPath();
context.moveTo(x, y);
context.quadraticCurveTo(cpointX, cpointY, x1, y1);
context.lineWidth = 5;
context.strokeStyle = "rgb(0,0,0)";
context.stroke();
// bird 2
// starting point coordinates
var x = 600;
var y = 50;
// control point coordinates ( magnet )
var cpointX = canvas.width / 1.2 - 10;
var cpointY = canvas.height / 10 - 15;
// ending point coordinates
var x1 = 650;
var y1 = 75;
context.beginPath();
context.moveTo(x, y);
context.quadraticCurveTo(cpointX, cpointY, x1, y1);
context.lineWidth = 5;
context.strokeStyle = "rgb(0,0,0)";
context.stroke();
// starting point coordinates
var x = 700;
var y = 50;
// control point coordinates ( magnet )
var cpointX = canvas.width / 1.2 - 10;
var cpointY = canvas.height / 10 - 15;
// ending point coordinates
var x1 = 650;
var y1 = 75;
context.beginPath();
context.moveTo(x, y);
context.quadraticCurveTo(cpointX, cpointY, x1, y1);
context.lineWidth = 5;
context.strokeStyle = "rgb(0,0,0)";
context.stroke();
context.stroke();
////////////////////////////////////// end above this line ˆˆˆˆˆˆˆˆˆˆˆˆˆˆˆ
};
</script>
</head>
<body>
<canvas id="myCanvas" width="800" height="600"></canvas>
</body>
</html>
Subscribe to:
Posts (Atom)